")


Contact Just Clean TODAY on
Driveway cleaning tips – step by step process
21st March 2022
Before you start cleaning, it is a good idea to ensure the following:
Old clothes to wear during the procedure – It is important that they completely cover the skin of the hands and legs because some detergents can cause allergies or skin irritation. Also, add household cleaning gloves to the “suit”.
Detergents – The simplest soap-based cleaning product would do a great job, but if your Driveway has greasy stains, get a degreaser, or just a solution of 1 cup white vinegar and 1 cup of water.
Rags, brushes, broom – you will need mostly for heavily soiled areas that need more rubbing.
Assess the condition of your Driveway
Before starting the procedure, inspect your Driveway. If there are oily stains or mold and mildew – they are the first thing you need to treat. If you leave them for last, it is very possible to spread them all over the surface of the concrete.
Clean your driveway with a broom
Before applying any detergents, sweep away any dust, fallen leaves, and dirt from your driveway with a broom. Remove anything that would interfere with the process – a trash can and any items that will not be part of the cleaning.
Start with the greasy stains
Since oily stains are the most difficult to remove – whether they are from car oil, food, or something else, we recommend that you start with them. Apply the stain remover of your choice and leave it on for at least 30 minutes. Some preparations may take even longer to break down the accumulated fat, so check the condition of the stain often. If it does not go away the first time, repeat the procedure until you are satisfied with the result.
Attack the mold and mildew
While you wait for the degreaser to act on the greasy stains, you can deal with the cracks in which mildew and mold have settled. Using a stiff brush, remove the unpleasant moldy stains and immediately apply your mold cleaning solution. You can again use a mix of white vinegar and water, you can buy a special anti-mold and mildew mixture from the store.
Continue with the rest of your driveway
Once you’ve destroyed all traces of rust, car tires, grease, mold, and mildew, it’s time for the final stage of cleaning your Driveway. Use a stiff brush with a long handle, a soap-based solution mixed with water and start scrubbing the concrete – make sure you don’t overdo it to avoid damaging its integrity and minimize the risk of getting cracks. Always start the cleaning from the side closest to your front door as you continue down to the street. Now you will be sure that you do not carry the dirt from the road straight to your home.
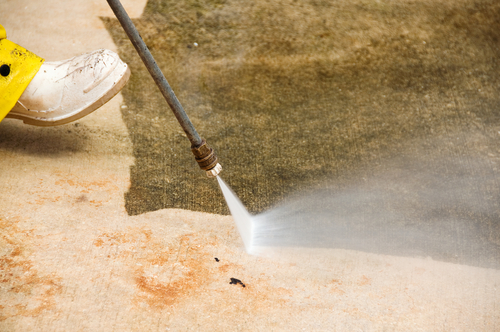
It’s time to rinse!
Once you have applied the last detergent to your Driveway, you can now proceed to rinse. If you own any power-pressure tool, you can use it as the last step of your cleaning process. However, if you don’t – a simple garden hose works as well. Go through each area of the Driveway to make sure no residue is left.
Now let it dry!
Sunny days are the best for Driveway cleaning. The sunlight dries the concrete quite fast and also kills bacteria and mold.


