")


Contact Just Clean TODAY on
DIY Roof Cleaning: Tips, Safety Precautions, and Step-by-Step Guide
27th June 2023
Welcome to Just Clean Property Care’s DIY Roof Cleaning guide. In this post, we’ll discuss why it’s important to clean your roof regularly, tips for safe cleaning and a step-by-step guide on how to do it yourself. Keep reading to learn more!
Why DIY Roof Cleaning is Important
DIY roof cleaning is vital to prevent damage and save money. Algae, debris and dark stains can accumulate on the roof surface over time, increasing water retention and potentially causing leaks. Using the best cleaners such as bleach or chlorine alongside regular cleaning will help keep your roof in top-notch condition.
Cleaning your own roof means you have control over what products are used in the process. Some commercial cleaners contain harmful chemicals that can pose health risks to humans, pets, and plants around your property. With DIY cleaning, you can use eco-friendly solutions that are safe for both people and nature while still achieving a spotless finish.
Prevent Damage and Save Money
Regular roof cleaning is essential to prevent long-term damage and save you money. Identifying potential roof damage such as algae growth, dark spots or debris buildup can help you take action before it causes major harm. To clean your roof, basic tools like a ladder, safety gear and cleaners are required. However, it’s best to avoid harsh chemicals like bleach or chlorine which may induce further damage.
Using the right cleaning techniques can also prevent future destruction of the roof. Start by removing any loose debris with a broom or blower before applying appropriate cleaners that won’t leave residue or cause discolouration. Cleaning should always be done on an overcast day when the temperature is lower than 60 degrees Fahrenheit for optimal results without causing harm to your roofing material.
Maintain Curb Appeal
Regular cleaning of the exterior roof can help maintain curb appeal and prolong its lifespan. Algae, dark stains, and debris make your roof look unsightly and may cause damage over time. Using the best cleaners such as bleach or chlorine to remove these stains is recommended for a DIY approach. However, it’s important to take safety precautions when working on roofs.
Re-painting or staining options are also available to give your roof a refreshed look after cleaning off unsightly debris and stains. It’s essential to choose high-quality paint or stain that will withstand harsh weather conditions for extended periods without fading quickly. Remember that maintaining your home’s appearance starts with taking care of every aspect of it, including the roof!
Health Benefits
Removing harmful algae, moss and mildew from your roof can provide multiple health benefits for you and your family. These growths not only make your roof look dirty but can also lead to respiratory issues due to the spores they release into the air. By using DIY methods such as soft washing with cleaning agents or manually scrubbing away debris, you can reduce these risks and improve overall indoor air quality.
In addition to reducing allergens in the air around your home, regular DIY roof cleaning with safe cleaners like bleach or chlorine can help combat dark stains caused by debris buildup on roofs. This will enhance curb appeal while ensuring a safer environment for those living under it. So if you’re looking for the best way to care for both yourself and your property, consider making DIY roof cleaning part of routine maintenance.
Tips for Safe DIY Roof Cleaning
When it comes to DIY roof cleaning, safety should always be your top priority. Make sure to wear non-slip shoes and use a sturdy ladder that can support your weight along with the weight of your equipment. It’s also important to check the weather forecast before you start cleaning since rain or wind could make the job more dangerous.
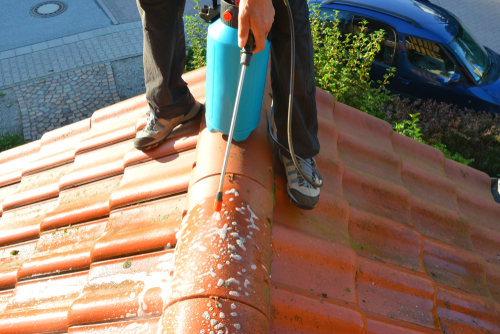
In addition to safety precautions, choosing the right equipment is crucial for effective and safe DIY roof cleaning. Opt for pressure washers with lower PSI options (around 1200-1500) so you don’t damage delicate roofing materials like shingles or tiles. And when in doubt, reach out to professionals who can recommend specific products based on your roof type and condition.
Safety Precautions
When it comes to DIY roof cleaning, safety should be your top priority. Wear appropriate protective gear such as gloves, goggles, and non-slip shoes. Always check the weather forecast before starting to ensure that the roof is dry and safe to walk on. Use a sturdy ladder with rubber feet and have someone hold it steady while you climb up. Avoid working on steep roofs or during windy conditions as this can increase the risk of accidents. And remember never use pressure washers as they can damage shingles or tiles leading to costly repairs down the line.
Taking these simple safety precautions when cleaning your own roof will help prevent accidents from happening, keeping yourself and others around you out of harm’s way whilst ensuring that your property stays in good condition for years to come!
Choosing the Right Equipment
When it comes to DIY roof cleaning, choosing the right equipment is crucial. It’s important to select a cleaning solution that is suitable for your roof type, such as using hydrogen peroxide for asphalt shingles. Additionally, using soft-bristled brushes or brooms will prevent damage to your roofing material while effectively removing dirt and debris. As an alternative to pressure washers, a garden hose fitted with a sprayer attachment can also be used.
Don’t underestimate the importance of selecting appropriate equipment when cleaning your roof yourself. Using harsh chemicals or rough brushes could cause costly damage in the long run. By taking these precautions and selecting suitable equipment, you’ll be on track for successful and safe DIY roof cleaning without compromising quality results.
Preparing the Roof
Remove any debris such as leaves, sticks, or branches from gutters and valleys of your roof using a leaf blower or garden rake. This is an important step to ensure water flows properly off the roof and does not cause damage to the structure of your home. Wet down landscaping around your home in case cleaning solutions run off onto plants. This will prevent any chemicals from harming your plants, grass or flowers.
Cover up any outdoor electrical outlets with plastic sheeting. Water and electricity do not mix well so it’s important to take this precaution before starting the DIY roof cleaning process.
- Use a leaf blower or garden rake to remove debris from gutters and valleys
- Wet down landscaping around home in case of run-off
- Cover outdoor electrical outlets with plastic sheeting
Step-by-Step Guide for DIY Roof Cleaning
Before starting DIY roof cleaning, make sure to assess the condition of your roof and identify any potential safety hazards. Once you have gathered all necessary materials and equipment, prepare the work area by removing anything that may obstruct your cleaning efforts or pose a risk. Begin by applying a suitable cleaning solution to small sections of your roof at a time, gently scrubbing away dirt and debris before rinsing thoroughly with water. Repeat this process until all areas have been cleaned to your satisfaction before conducting a final post-cleaning inspection for any missed spots or damage. Remember to always prioritize safety first when undertaking any DIY project on your property.
Step 1: Pre-Cleaning Inspection
Check for damages and leaks, remove debris from the roof, and identify the type of roofing material before starting your DIY roof cleaning project. These steps are crucial in ensuring that you can clean your roof safely and effectively.
- Check for any visible damage or leaks on the roof
- Remove any debris such as leaves or branches
- Identify whether you have asphalt shingles, metal roofing, tile or slate.
Not addressing these issues before cleaning could lead to further damage to your roof or injury during the cleaning process. Take a few minutes to do a thorough inspection of your roof before moving onto step two.
Step 2: Gather Materials and Equipment
For a successful DIY roof cleaning, gather the necessary materials and equipment before starting. Choose a cleaning solution that’s suitable for your roof type to ensure effective results without damaging the surface. Safety is crucial, so get safety gear like gloves, goggles, and boots to protect yourself from potential hazards. Additionally, consider renting or buying a pressure washer if you don’t already have one at home.
Make sure you have everything you need within easy reach before beginning the job. This avoids interruptions during work which can cause delays or accidents. Properly gathering all required items may take some time but it’s worth it in terms of ensuring good results and keeping everyone safe while working on the roof.
Step 3: Prepare the Work Area
To ensure safety and prevent accidents, it is important to prepare the work area before starting your DIY roof cleaning project. Cover nearby plants with tarps or plastic sheets to protect them from any solution or debris that may fall during the cleaning process. Secure ladders in place to prevent falls and injuries while working at heights. Additionally, remove any obstacles around the work area that could cause tripping hazards or obstruct your access to necessary equipment and materials for a smooth cleaning process. These simple precautions can make a big difference in ensuring a successful and safe DIY roof cleaning project.
Step 4: Apply Cleaning Solution
Before applying the cleaning solution, carefully read the instructions on how to mix it properly. Incorrect mixing can lead to damage or ineffective results. Once you have mixed the cleaner, apply it using a sprayer or soft-bristle brush, depending on the type of roof surface.
Allow the cleaner to soak into stains before rinsing off with water – this will help loosen dirt and grime for easier removal. Avoid letting the solution dry completely as this may cause streaking or residue buildup. Take caution not to step onto wet areas during application and always wear appropriate safety gear such as gloves and goggles when handling chemicals.
Step 5: Rinse and Repeat
Once you have applied the cleaning solution and scrubbed away all the debris, it’s time to rinse off any remaining residue. Make sure that you thoroughly rinse off all cleaner residue with water to avoid any damage or discolouration on your shingles. If there are stubborn stains that haven’t completely disappeared after one round of cleaning, repeat the process until they disappear.
While washing your roof, it is important to be cautious not to damage your shingles during the process. Here are some tips for safe and effective rinsing:
- Use low-pressure settings on your pressure washer or stick with a garden hose.
- Start from the highest point of your roof and work downwards.
- Avoid directing high-pressure jets at an angle towards edges or corners.
- Keep children and pets indoors during this step.
With these steps in mind, you can give yourself confidence in tackling DIY roof-cleaning projects safely and effectively using Just Clean Property Care’s expertise as a guide!
Step 6: Post-Cleaning Inspection
After completing the cleaning process, it’s important to inspect the roof thoroughly. Check for any missed spots or areas that may require additional attention. This is also a good time to ensure that all equipment and materials have been properly stored away.
It’s crucial to take safety precautions during this inspection phase as well. Avoid walking on wet or slippery areas of the roof and use caution when using ladders. If there are any concerns about potential damage or necessary repairs, consult with a professional before proceeding.


